Archive for the ‘Farmed’ Category
mission: sprouts and fennel
t says: g and I were in the mood for a veggie-centric dinner, so we were set on grilling up some fennel and Brussels sprouts … until it rained. Damn! No outdoor grilling for us … To the broiler!!
Because I’m trying to cook anise and Brussels sprouts at the same time, I have concocted a pretty involved manner of cookery involving broiling … but it’s not just “broil for 20 minutes, and you’re done”. That’d be too easy. AND, it’d result in unevenly cooked food! So this is how I choose to do it …
0) Preheat oven to 450 degrees.
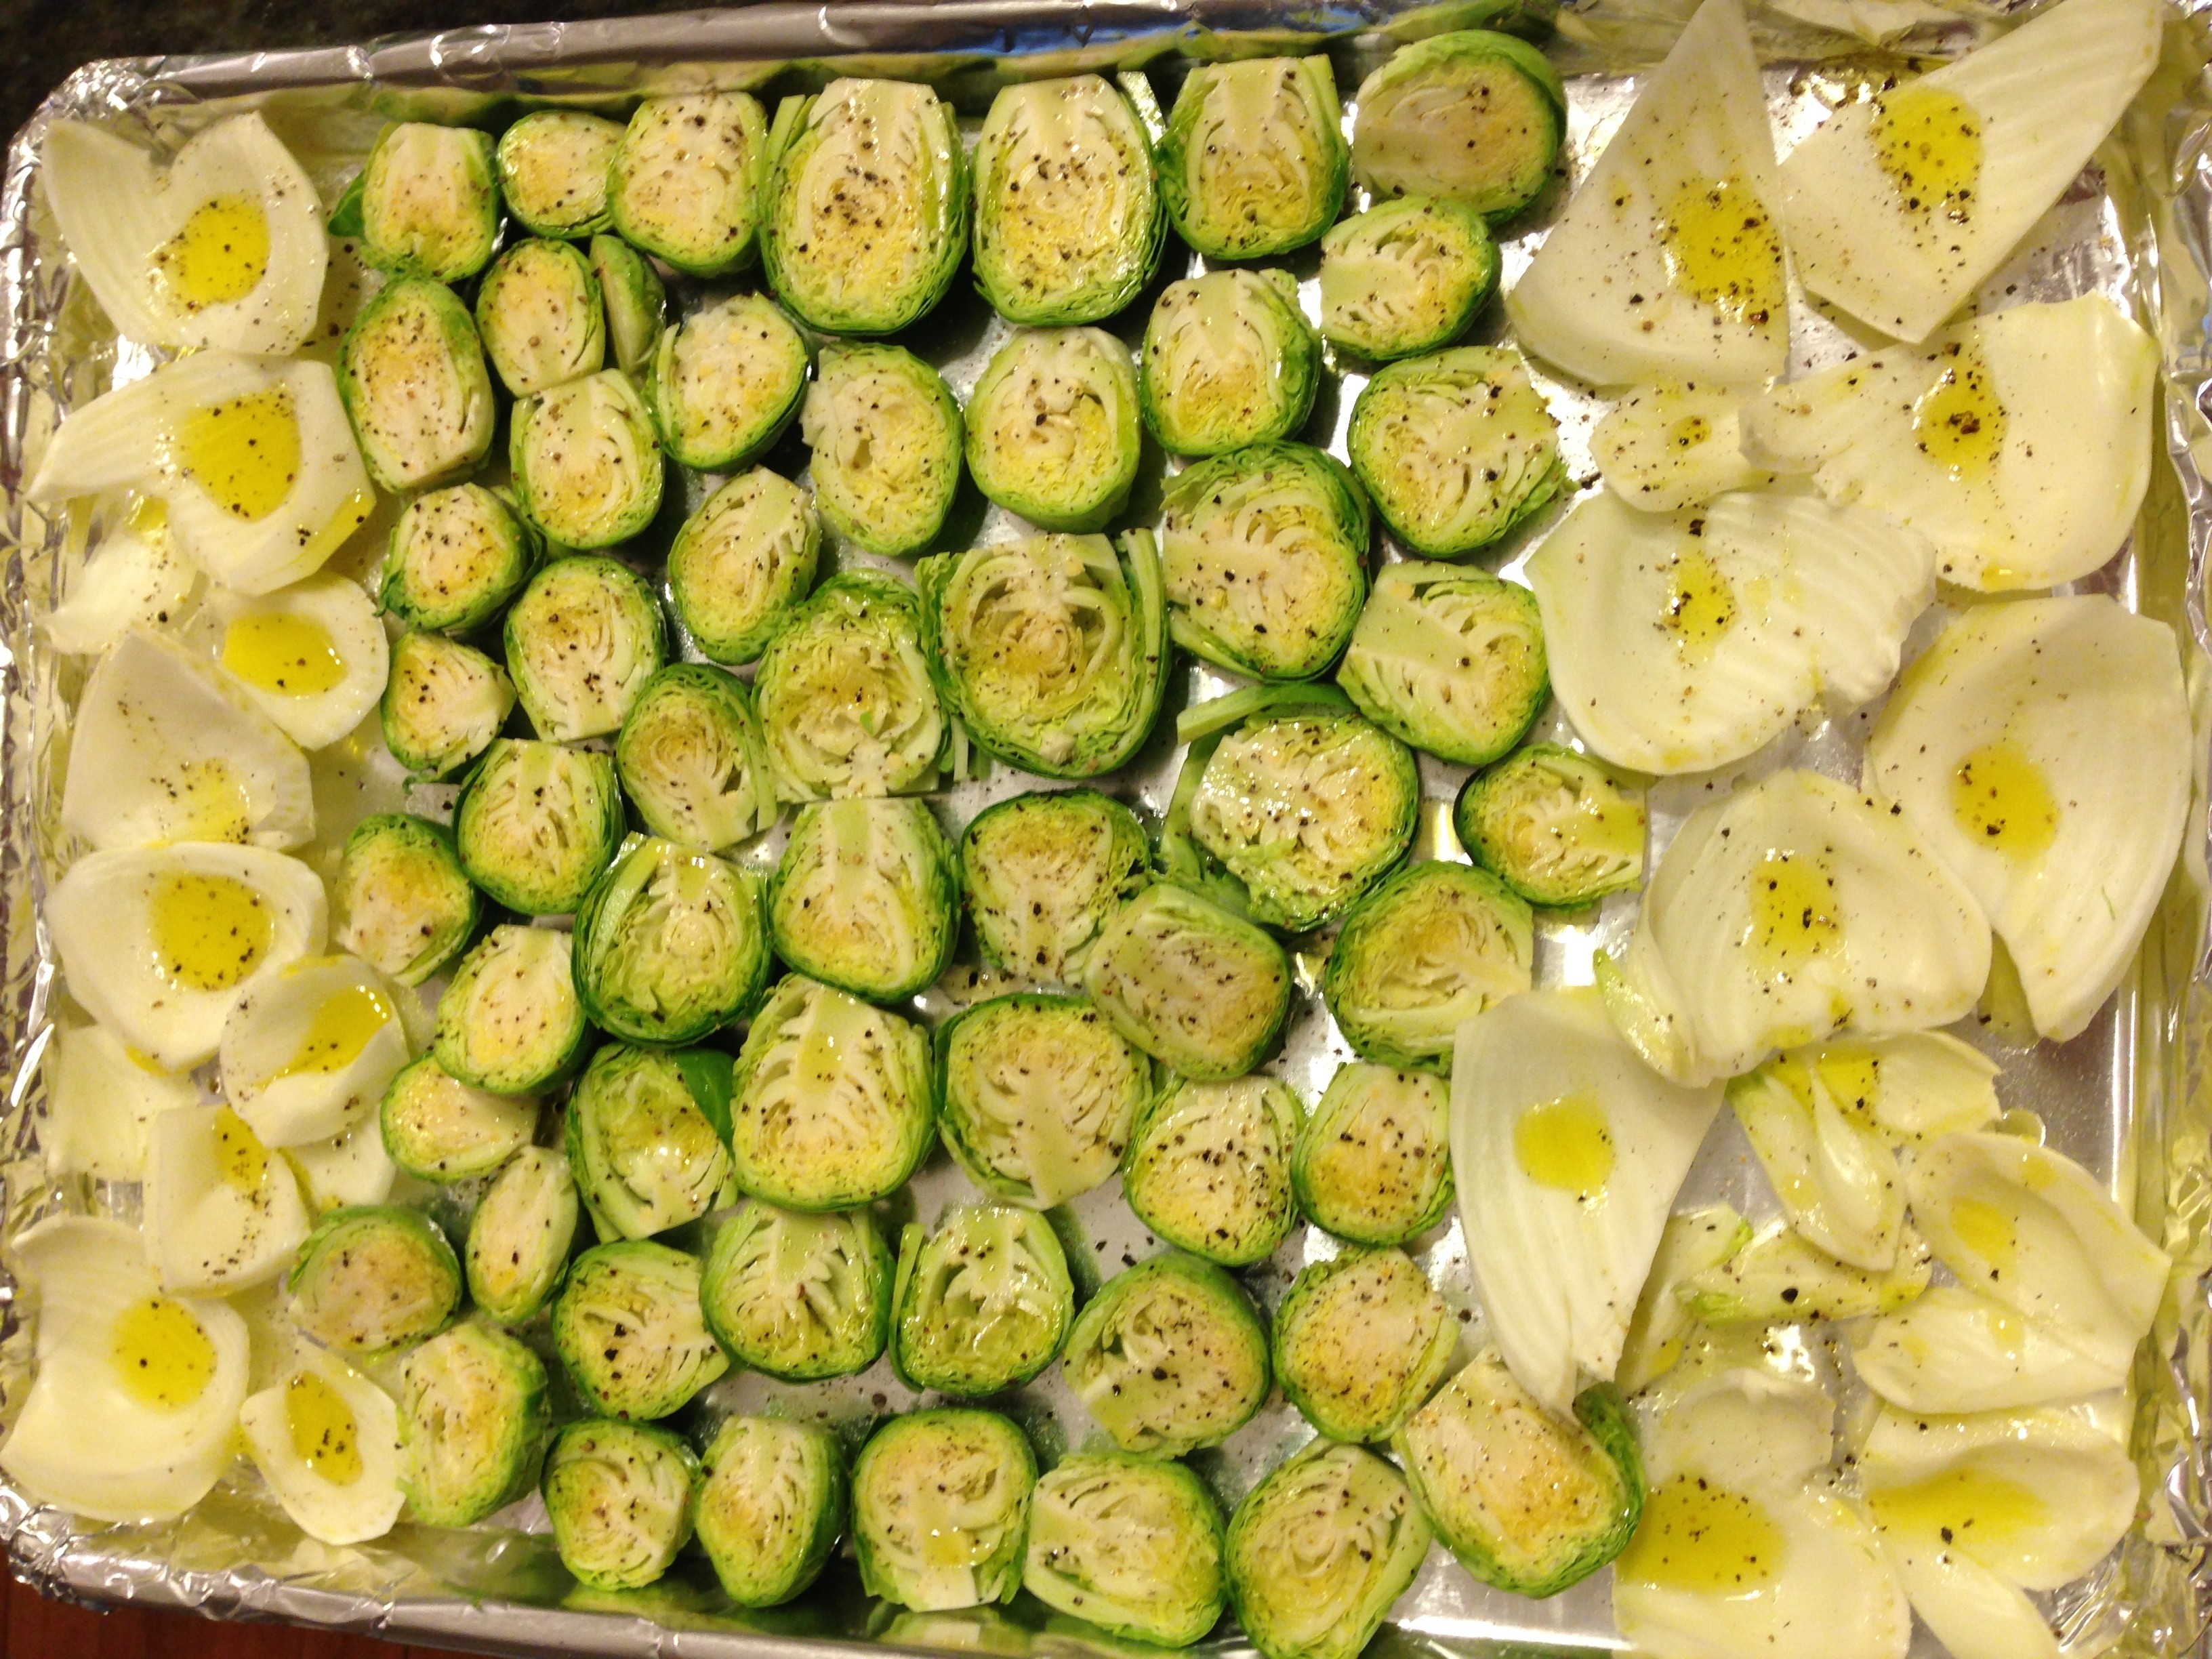
1) Arrange halved sprouts in the center of a lipped baking pan, as above, such that all of the sprouts (~30 Brussels sprouts, therefore ~60 halves) have their cut side facing up. Place the layers of fennel bulb (~2 bulbs worth) on the extreme right and extreme left of the pan, and arrange them such that they all curve upwards. Drizzle with olive oil and aggressively season with salt and pepper.
2) When ready, change the oven over to the “BROIL” setting, and get ready to start cooking with the oven door propped slightly open. Now it’s time rock and roll: the cookery is a 4-step process …
2a) Place baking sheet on oven rack ~6″ from the heating element, all the way to the left. In a normal sized oven, this will place the right-most Brussels sprouts directly under the heating element, while the left-most fennel will be all by their loansome, barely getting any love/heat. Continue until the sprouts right underneath the heating element are golden brown (~5-7 minutes).
2b) Move the baking sheet all the way to the right. Now the left-most sprouts will be directly under the heating element, while the right-most fennel (which has also been nicely browned) will be cooling off way away from the heating element. Continue until the sprouts right underneat the heating element are golden brown (~5-7 minutes).
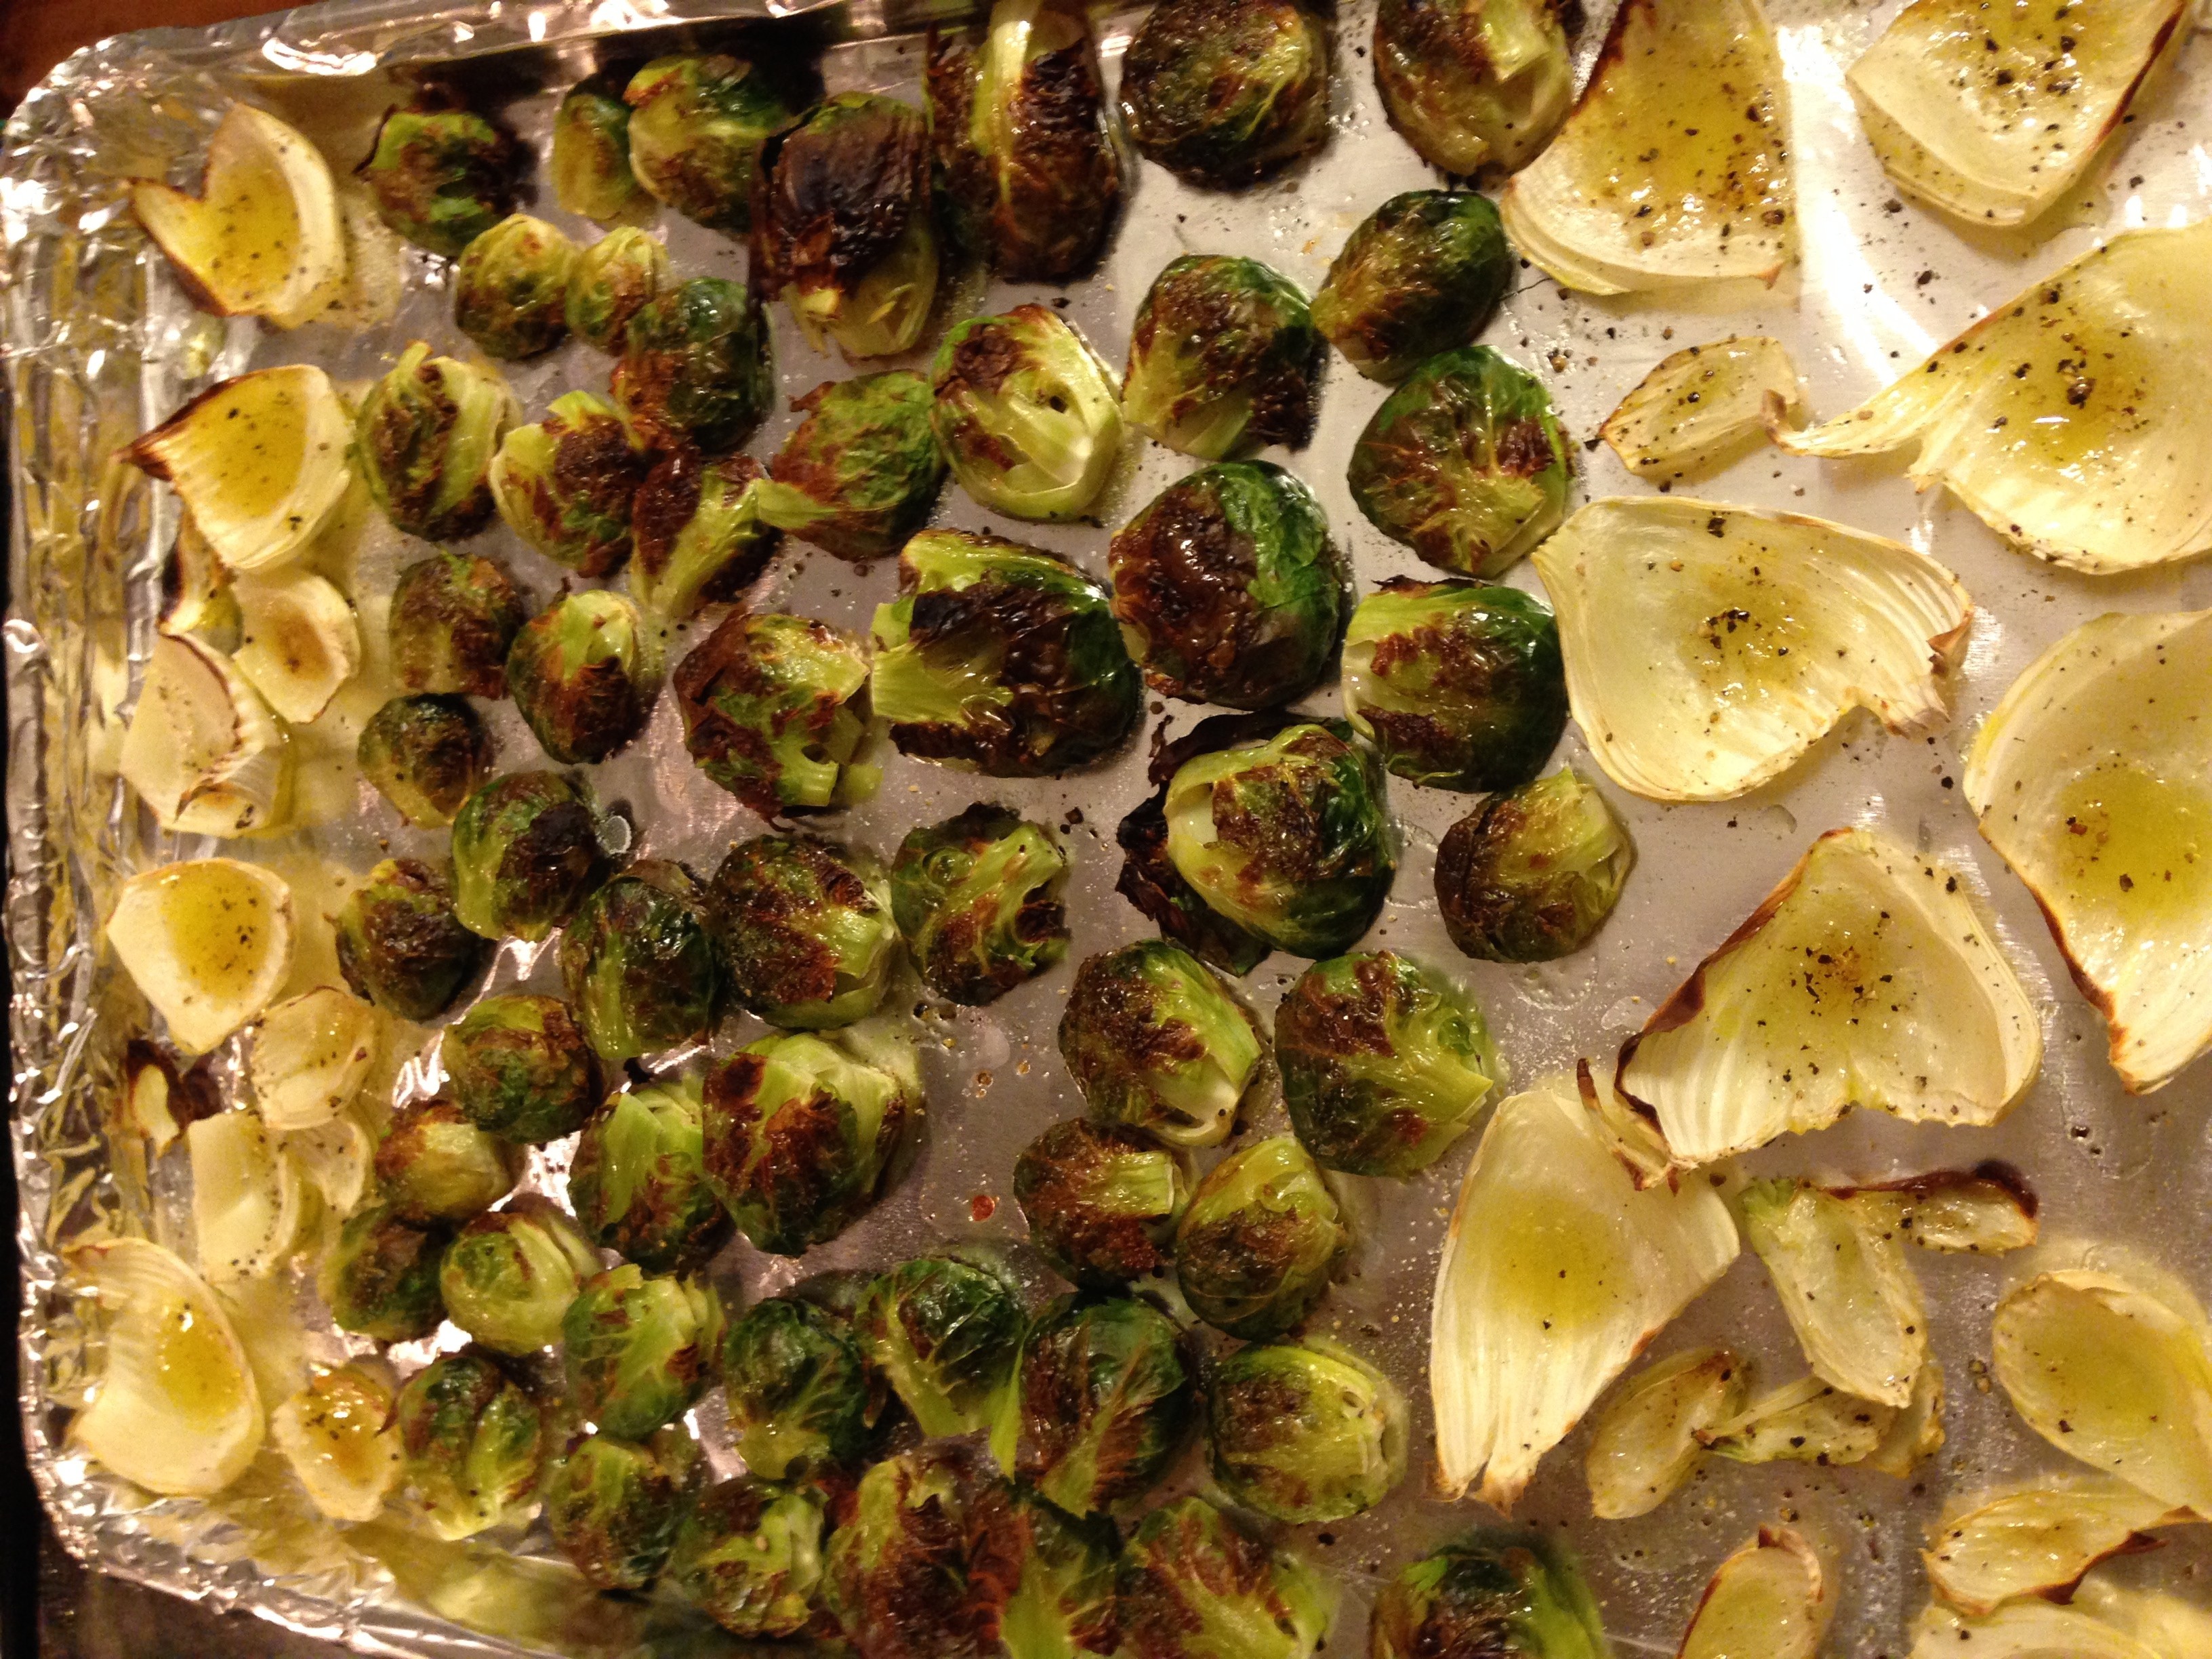
2c) By now, all the sprouts are beautifully browned, but as usual for broiling, they are not yet cooked completely (you can try one to see how it is, and unless you got some really small sprouts, they’re probably very raw-crunchy (as opposed to cooked-crispy). Thus, remove the baking pan from the oven and flip all of the sprouts over, so now the cut side is facing down. Repeat steps 2a and 2b in an effort to brown this side of the Brussels sprouts. When you are done, this is what you’re left with!
Voila! Beautiful fennel. And almost-completely done sprouts!
3) Remove the fennel and arrange on a plate in a dramatic fashion … like this:
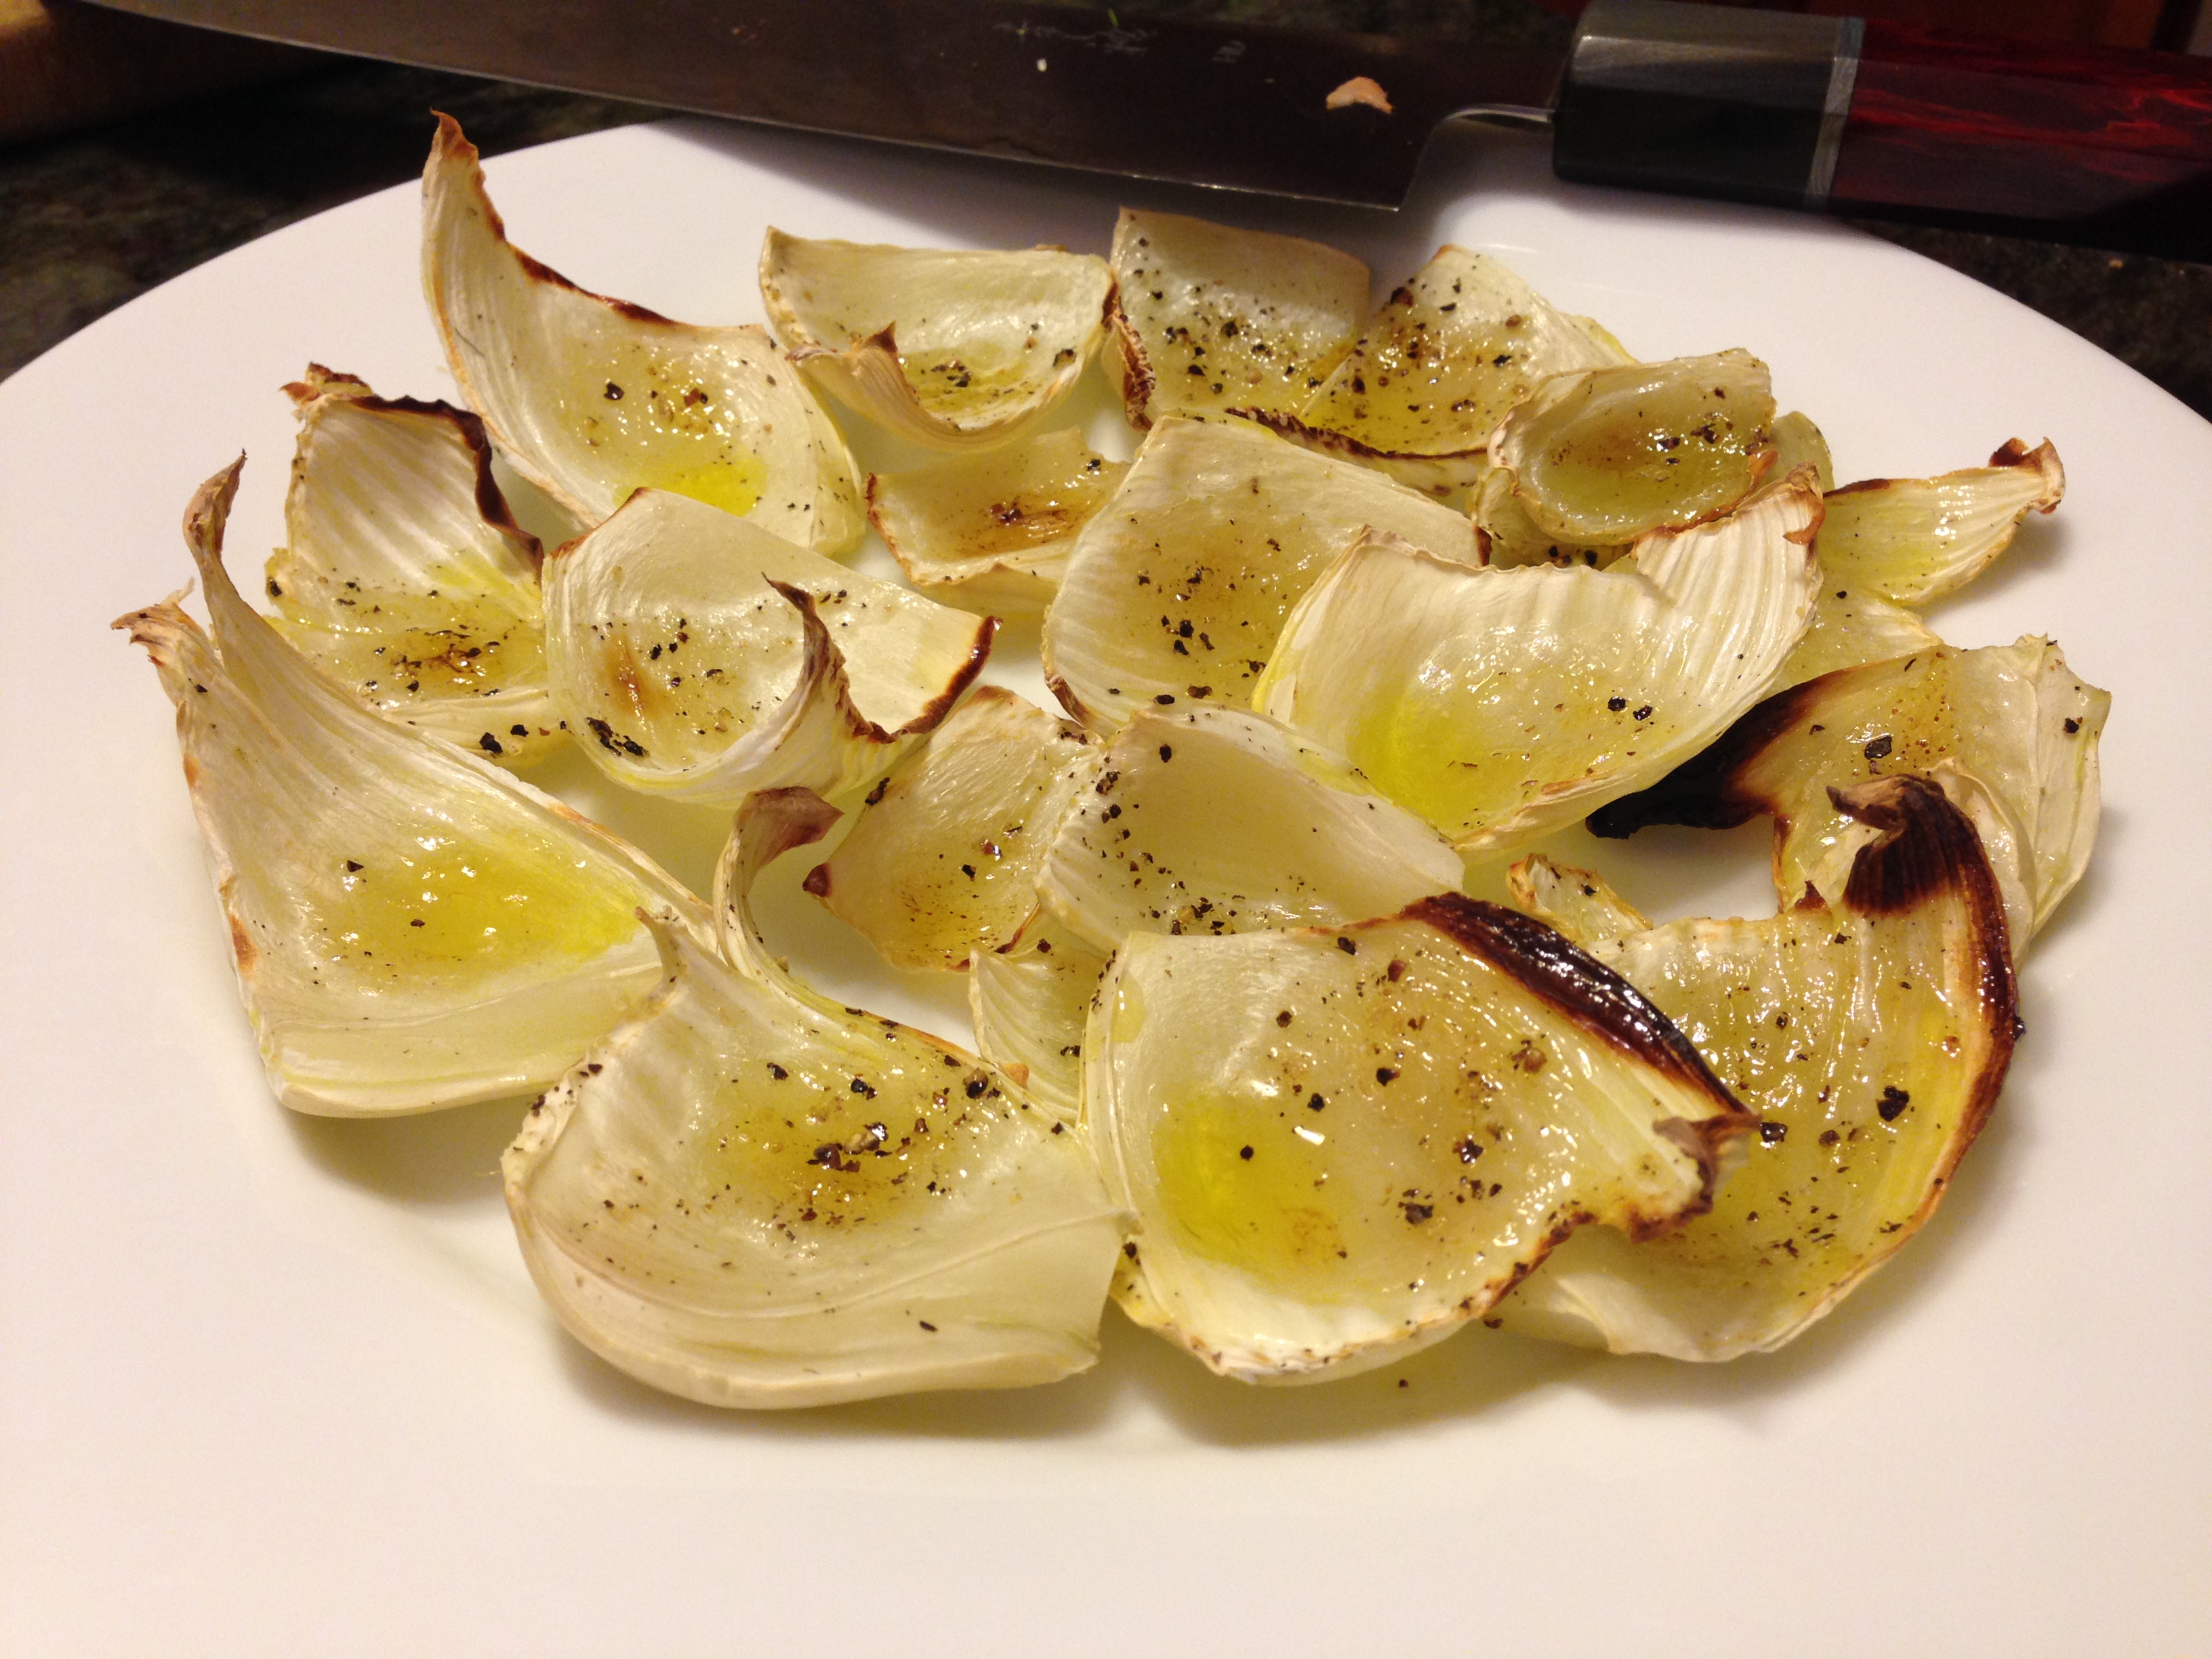
Sure is pretty!
4) Now, the sprouts have one problem left … when you turned them upside down to broil their undersides, the beautifully browned cut sides are now a little mushy!! Boooooo! Having crispy leaves is the best part!! So now what you do is turn them all back over … stick them back under the broiler for a few minutes … and when you see that they’re getting to an almost-but-not-quite-burnt state, you take ’em out … and, of course, arrange them nicely on a plate:
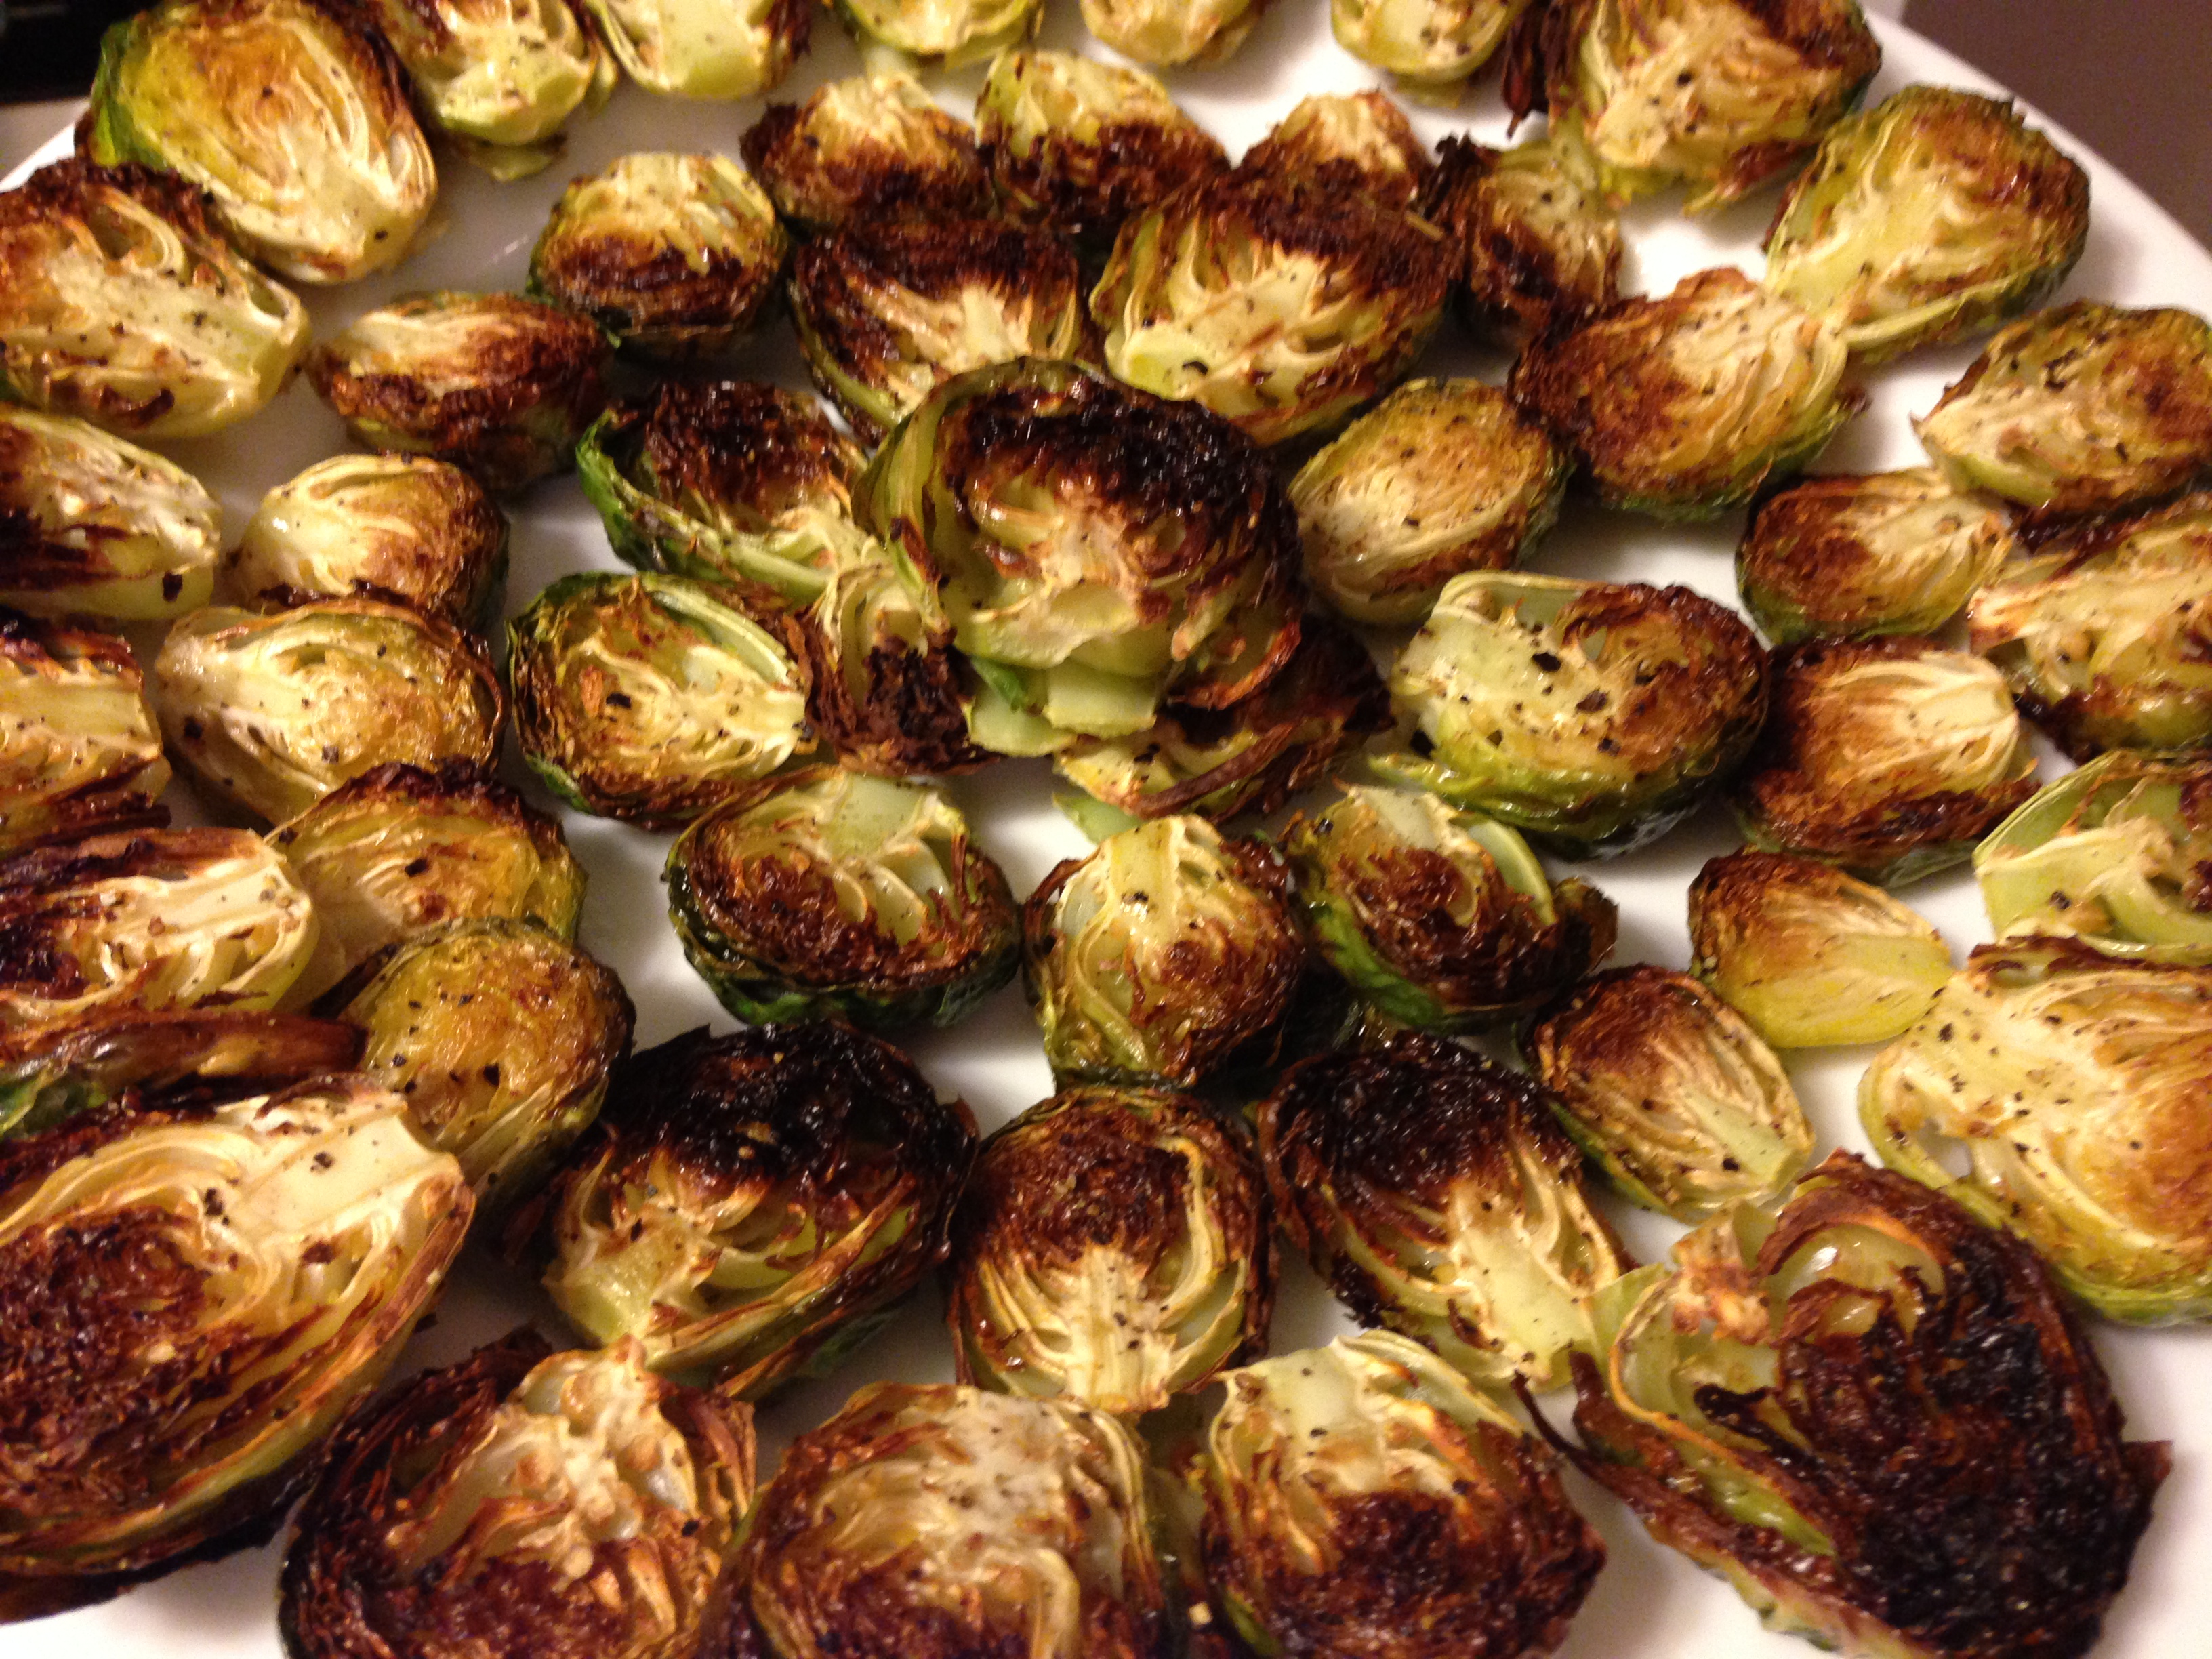
Brussels sprouts can handle this amount of char – they taste awesome this way!
And there we go – roasted fennel and a broiled Brussels sprouts! It seems like I’m nit-picky [and I am!] but it’s worth it!
Our Philly Diner en Blanc Primer
t says: Ah yes. Diner en Blanc. Pictures are everywhere. We have some, too, but a lot of them have our mugs on ’em, so we’re not going to be able to show those off. Instead, we’re going to treat this kind of like a “how g-&-t-&-a-&-v do Diner en Blanc”. Hopefully this post will be helpful for our planning next year …
g and I easily sourced our table and chairs, but we had to decide what was going to go on the tabletop. There were so many options of glasses and utensils that we needed to visualize it. Fortunately, Dr. Moody (a gift from lc) was ready-willing-and-able to help out:

Dr. Moody lends a helping hand by modeling different dinnerwares …
Eventually, we did decide on our tabletop selections, and everything looked pretty darn spiffy:

our tabletop!
The ONLY regret we had was that our selections were damn-heavy. The glasses: real glass. The dishes: real porcelain (and there were two!). The silverware: real metal. That bottle our water was in: real glass. g and I are not World’s-Strongest-Man material – we can say that by the time we got to the site, we were quite pooped. And we can only imagine what a was going through, as his table was even heavier than ours! Of course, part of why we were pooped was due to stupid-as-crap route they took us to go from 30th street to Logan Square, but that’s another rant … (“To the Main Line!”)

The official g & t mascots of Diner en Blanc … hiding under the shrubbery … we should have won “best table” for them alone … nevermind the edited, classy display of properly placed utensils, a single vase, a single candle, real steak knives, antique cheese spreader-thingees, big wine glasses …
The four of us also brought our own home-made food. There were others who did the take-out thing with some classy-looking foods (table next to us had some sliders, I saw some Italian take-out elsewhere). I saw there were a lot of people there trying to be “unique” by bringing sushi, but that ultimately ended up being as “unique” as getting a butterfly tramp stamp <re-read this sentence and play the effect at sadtrombone.com for full effect>. Ultimately, v and g took it upon themselves to craft a meal that was built especially for DeB. The food needed to be able to be served at room/outdoor temperature. It needed to be transportable. It needed to be light. It needed to be filling. It needed minimal number of components (i.e. minimal number of gladware). It needed to lack any sauces that would dribble everywhere or leak in our picnic basket. It needed to be pair-able with wine. It needed to be shareable in case we got friendly with neighbors. It needed to be eaten with fork and knife (after all, this is a classy event …) This is what they came up with …

quinoa salad
v made a quinoa salad and it was scrumptious. v said that it was based on a recipe she found here – except no gouda and a different vinegar; it turned out to be a feast for the eyes as well as the mouth. We paired it with a rose that a picked out from the PLCB and we were in heaven (seriously, this may have been the best rose I’ve had all year … it’s been such a tough year of roses for me – nothing like a legit Bandol to really show the world how to do a proper rose). I could not think of a more fitting start to an outdoor summer meal.

“g surprise”
g whipped up a pasta dish inspired by something her mom crafted the other day. The main idea was pasta and cheese and chorizo and wilted spinach and multi-colored bell peppers for some crunch. g’s still got it! And, of course, we microplaned some more cheese at the table. For this course, a pulled out a delightful red he found at Moore Bros. I was worried at first that it was going to overtake the summery pasta, but the tango was pleasant (there was a good amount of cheese in the pasta, so there was some richness and flavors in there to compete with the red). The pairing probably wasn’t “perfect”, but of course a also had no idea what was going to be in the pasta, either (we literally called it “g surprise” when we made up the sample menu).

cheese plate
For the cheese plate, we had some Pecorino Fulvi, a triple creme goat/cow blend from GTC, and garrotxa. This was accompanied by garlic dulce de leche (not pictured), some pistachios, prosciutto, and fig. It was a very interesting assortment of mild cheeses – fun to mix-and-match with accompaniments and wine. By now, we moved on to Erath “Le Jour Magique” White Pinot Noir … it rocked my socks again.
")
dessert …
We finished with an apple tart that v made (recipe here). It was beautiful (and somehow we managed to transport it still intact). I topped it with some crushed heath bar, and we would have had some diced cherries had I not forgotten them at home (my one actual regret!) Nevertheless, the tart was bold enough to stand on its own, proudly proclaiming its appleness and showing off a crust that kept me coming back for more. The dessert, combined with a Vouvray bubbly (NV Francois Pinon Brut, of NYT fame) was a solid outdoor sparking wine (not that I could drink the bubbly … but I’m told!). I heard so many positive things that I bought another bottle!
In all, DeB was a great time. We liked our food choices. We liked our wine choices. The “lows” of the evening were probably the lugging of our stuff to Logan Circle/Square and trying to manage a cracked cork without spilling red wine everywhere (I hope a’s official DeB attire is ok!). The people around us were nice enough. Fun was had by all. Can’t wait for next year!
w’s bash
t says: w’s thoughtful and loving fiance threw her quite a party in celebration of a milestone in her career. I have to admit that I was pretty tired that evening (i.e. I was working that weekend), so I wondered whether I could find a gracious way to bow out – sleep was very desirable. Boy am I glad I did no such thing … cuz then I would have missed this:

Lord of the Flies, anyone?
w’s fiance wasn’t kidding when he said he would supply “lots of meat”. g and I were thinking, “charcuterie platter?” No – this was WAY better. And it didn’t just have shock value – it was a damned tasty pig. Super-succulent. And it also had a gallon of what I can only imagine are pig drippings in case you wanted to have some jus on the side. (Speaking of which: kp, did you freeze that stuff?). This was perhaps one of the most brilliant moves I’ve ever seen at a potluck-y celebration – so much so that I will certainly steal it. If anyone knows where the pig came from, comment on the bottom and I’ll add it.
There was a LOT of other food there – and it was all spectacular. g whipped up her nana’s potato salad, which seemed like it had some pretty fervent supporters. Stay tuned for a post in the recipe section for more details on how to make it.
And finally, there was a ton of great homemade desserts. The one that caught my tongue the most was this one:

[a melting] key lime pie
a serious tofu post
t says: I like tofu. I don’t like it because of some health-related reason (i.e. it will never replace meat in my book). And I certainly don’t like it because eating it is sometimes hip/cool/fashionable. But sometimes, I just need a little tofu in my life. g doesn’t like it. sr doesn’t like it (he points out that it sounds remarkably like “dogfood”). lc, despite being tricked into eating it, doesn’t like it. But man-o-man, put it in a good kimchi jige and I’m a happy guy.
The thing is, what do you do with tofu that’s nearing the expiration date but hasn’t yet been used? My mom likes to make something that she calls “tofu steaks”. Don’t be misled by the name – there’s no meat in it. Actually – I’m confused because as far as I can tell, at no point does the cooking process resemble that which one could use to cook a steak. Thus, I decided to find a recipe that does …
The one I settled on was this one. It’s pretty simple and has some nice pictures. I followed it and got the same result:
")
fried tofu
The golden crust was sweet and crunchy. The consistency was kind of like a scrambled egg (it wasn’t just watery mush). And as for taste, it was probably some of the best unadulterated (i.e. un-sauced) tofu I’ve ever had. I don’t know if it was the olive oil, the salt, the pepper, or the crushed red pepper flakes I added, but I’d buy some tofu and try it again just to make sure it wasn’t some kind of mistake (maybe I was really hungry?). I do need to note that I wasn’t eating all that tofu completely solo – I had it with some rice and bulgogi and kimchi. g didn’t even try it it – she doesn’t know what she’s missing. Oh well – maybe I’ll trick her into it next time! Or maybe I’ll try this!
PB&J Cereal
t says: The other day I wanted lunch. But there was no food in the house. I spied some PB and J, so I figured that I’d make myself a sandwich. Unfortunately, I forgot about a critical ingredient – there was no food in the house … including no bread. Darn! I cursed my luck as I stared at the jars of PB and J sitting on the counter. Also on the counter was a box of Multigrain Cheerios (left out from earlier in the morning). And then it hit me. What if I had PB and Jelly cereal. Blasphemy, right? But why’s it song wrong? Cereal’s kind of like a grain! And it’s fortified! Maybe it’s even better than bread! So here’s what I did.
Ingredients:
__ 1 spoonful of PB
__ 1 spoonful of jelly/preserves (strawberry rules!)
__ a microwave-safe bowl
__ some cereal
__ some milk
Methods:
1) Put the PB into the bowl. Nuke for 30 seconds.
2) Mix the PB in the bowl so it’s nice and smooth (should be very soft). Add cereal and toss lightly until cereal is coated. It’s funky at first cuz it’ll seem like there’s not enough PB, but just keep on it and it should spread out.
3) Add the spoonful of jelly/preserves and toss – the jelly will end up thinly coating the cereal and hiding in some nooks and crannies – it’ll seem like there’s not enough – add more if you want, but try not to overdo it – it’ll be too sweet.
4) Add milk and enjoy!
Now, I know this doesn’t sound complicated. It’s not! It also doesn’t look pretty – but that’s ok!
")
PB and Jelly and Cereal
Who cares what it looks like? Eat it as you would cereal. I find that it adds some “oomph” to the cereal (i.e. it cuts down my AM cereal consumption from 2.5 bowls to 1) and is quite tasty. Give it a whirl once – chances are likely that you’ll more often have PB and J and cereal lying around than you will slices of bread!
Eggplant Parmigiana-Lasagna
t says: This weekend, like every weekend, I wanted to make something that would last us a few meals. I had a hankering for eggplant parmigiana, but I find that I get tired of eggplant parm really quickly. For me, there’s just too much eggplant flavor so that I’m usually eggplanted out by the end of my meal – who knows how I’d feel by the third time I’ve had it in the same week! Also, the texture of plain ol’ eggplant also gets boring when it’s reheated (you lose the crunch of the breading). But I got to thinking – what if I jazz it up with some meat? And use some different cheeses? And some pasta? It didn’t take me long to realize that I was no longer playing around with an eggplant parm recipe, rather, adding eggplant to a lasagna recipe! There we have it – a lasagna and eggplant parm hybrid! The recipe that follows is the love-child of Alton Brown’s eggplant parm recipe and Ina Garten’s turkey lasagna recipe.
When all the cooking was done, I think it was pretty good, and it’s definitely something I’ll make again. This is NOT a very gravy-full recipe – if you like tomato sauce, you can up the quantity. It’s also NOT a big puddle of oozy cheese. Everything is balanced (in my opinion), so I don’t think I’m going to make straight-up eggplant parm anymore (this way is just more fun). Don’t be intimidated by the number of ingredients or steps – it can be made easier by using oven-ready pastas or ready-made gravy (although the latter is sometimes a little yuck – but Barilla makes some decent sauces)! You could also omit the meat (but what’s the fun in that?), or swap out the veal for more turkey if you’re not a fan of red meat. g had the idea to add a layer or two of sauteed spinach … but I forgot … oops! In any case – you get the idea – it’s a pretty versatile recipe. You don’t even have to use this one – but try adding eggplant parm to your favorite lasagna recipe and see what happens!
Ingredients:
for the eggplant …
1 eggplant
all-purpose flour, panko bread crumbs, Progresso “Italian style” bread crumbs, Parmesan/Romano grated cheese (the cheap kind)
4 eggs
canola oil and olive oil in a 50:50 mix – although if you only want to use one, go for canola – higher smoke point
2 baking sheets (optional)
for the pasta of the lasagna …
use whatever you want – oven ready is probably the easiest so you have less to think about or do …
for the cheeses of the lasagna …
1 lb fresh mozzarella, cut into slices
16 oz ricotta (we like part-skim)
4 oz goat cheese (doesn’t have to be fancy goat cheese – we used the cheap President brand)
1 cup grated parmigiano reggiano
1 egg
2 Tbsp finely chopped flat-leaf parsley
0.5 tsp kosher salt
0.25 tsp black pepper
for the tomato sauce of the lasagna … (you can substitute the sauce-relevant ingredients for at least 28-oz of whatever pre-made tomato sauce you want – you’ll still want the meat)
0.5 medium yellow onion, diced
2 cloves garlic, minced
28 oz can of crushed tomatoes (we <3 Tuttorosso brand “with basil” – Wegman’s brand is ok – Hunt’s is awful)
basil (if your tomatoes don’t have some in it)
0.25 tsp baking soda
2 Tbsp grated cheese
0.5 lb ground veal
0.5 lb ground turkey
Methods:
-1) The point is to try and remove some of the excess liquid from the eggplant. Maybe this step is completely unnecessary – it might just be something Alton Brown does. Personally, I didn’t mind this step because it gave me the chance to take care of other prep work like making gravy, etc. Slice eggplant lengthwise (i.e. the cutting stroke starts from the top and goes to the bottom) into 10 super-long slices. I use 10 slices because I like 2 layers of four slices in the lasagna, and the two outside-most slices have a lot of “skin” on them, which isn’t that pleasant to eat through, are thrown away. Cut the green part off. Line baking sheet with foil. Line the sheet with paper towels. Lightly sprinkle the baking sheet with kosher salt. Arrange eggplant into a single layer (you may have to use two layers separated with paper towels). Sprinkle with kosher salt. Cover with paper towels. Do a second layer if you need to. Place a second baking sheet on top of the paper towel and eggplant layers. Put something heavy on top of the second baking sheet. Go do some other steps while the moisture gets pressed out.
0) Start a pot on the stovetop with ample salted water for preparing noodles (but don’t make it yet). If you have oven-ready sheets, then nevermind. Set aside the number of noodles you’ll need to make two single-sheet-thick layers (with a little overlap) in the baking dish of your choice (I used 9″ x 13″).
1) Make the ricotta cheese mixture … Combine the ricotta, goat cheese, parmigiano reggiano, egg, parsley, salt and black pepper (i.e. everything but the mozzarella). Set aside in fridge.
2) Make the meat gravy … In whatever pot you intend to make the gravy in, brown the two meats in a tablespoon of oil. You may have to do this in batches so you can get a nice color on the meat (otherwise, you’ll essentially boil or steam the meat, which isn’t as flavorful). Set meat aside (leave the fat in the pot). Add onions and cook until translucent. Add garlic. When fragrant, add tomatoes and return meat to pot. Add the grated cheese and baking soda. Let the pot cook down for a while under a very low heat.
3) Prep the eggplant … Preheat oven to 400 degrees. Set some kind of frying vessel on medium heat (or just a smidge above medium – I used a setting of “6” on a scale of 1-10). You don’t want it to smoke when you add the oil (which you should add later, right before you start frying). As far as what kind of vessel – I like a 4 quart pot – the tall sides prevent too much splashing. Set up a 3-stage dredging system: 1 bowl of flour, 1 bowl of beaten eggs, 1 bowl of bread crumb mix. For the bread crumb mix, I like using panko (for the crunch), Italian-style bread crumbs (for the flavor), and cheapo grated cheese (also for the flavor) in a 2:1:1 ratio. Feel free to use whatever bread crumbs or ratio you want. Free the eggplant from the baking sheet sandwich you made. Wipe them with paper towels to remove excess salt and liquid. Dredge with flour, then egg, then breadcrumb mixture. Set slices aside until done dredging.
4) Fry the eggplant … Add oil to your heated frying vessel on the stovetop (I like a half-inch deep pool of oil). Fry the eggplant slices until they get to a pretty color (I go two at a time b/c that’s what fits in my pot) and set them aside on some paper towels to absorb the excess oil.
5) Make the pasta … Cook the noodles according to instructions on package. If you have oven-ready sheets, then double-check and make sure you don’t have to do anything to them except stick them in the oven (I’ve never used them, myself, so I leave that up to you).
6) Layer the lasagna … Place 1/3 of the gravy on the bottom of a 9″ x 13″ baking dish. Layer as follows: 1 layer of lasagna noodles, nearly half of the mozzarella slices, 4 slices of eggplant, half of the ricotta mixture, 1/3 of the gravy, 1 layer of lasagna noodles, nearly half of the mozzarella slices, 4 slices of eggplant, half of the ricotta mixture, the remaining gravy, and the remaining mozzarella (broken apart into small chunks and scattered on top).
7) Cook the lasagna … Bake at 400 degrees for 30 minutes, until you see bubbling throughout the baking dish (the egg in the cheese mixture is the only raw ingredient in the lasagna), and a nice browning of the mozzarella on top. Cool and enjoy!
Kimchi Pizza (with pix)
t says: You read the title, and now you’re wondering: “why?”. Trust me, it tastes good.
For those that don’t know what kimchi is, here’s a picture:

Meet my friend Kimchi.
It’s cabbage that’s been pickled in a fiery red chile liquid. Korean grandmothers are said to have buried jars of it in the ground as it “ripens” in flavor (that’s my term for it). It’s not much to look at (it’s red cabbage) and it’s offensive to the nose (I thought that they buried it due to lack of modern refrigeration, however, I now believe they buried it to keep it out of the house). Nowadays, most people will either have a separate fridge for it or keep it for no longer than a couple days. But the taste is unique; it’s sour and spicy and (depending on how far along it was) crisp and fresh. It’s also readily available in Korean supermarkets (e.g. Hmart), and the quality’s pretty good.
So now, back to pizza … Surely you’ve had your fair share of frozen pizzas, be it Ellios pizza as a kid, Bagel Bites in college, or DiGiorno as a sucker for believing those dumb commercials (been there, done that). Well, g had some friends in college who claimed that that putting kimchi on frozen pizza was the best way to make it, period. I’ll admit, I was doubtful at first, as cheese and kimchi is not a traditional combination (I blame the higher prevalance of lactose intolerance among Koreans). That said, in our household, kimchi has elevated the frozen pizza from a we-should-keep-one-in-the-freezer-just-in-case option to a we-should-definitely-eat-frozen-pizza-for-dinner option. We’ve tried many varieties of pizza and they all work reasonably well (with one exception being the self-rising crust pizzas – I guess there was too much liquid in the kimchi). The following is the best combo we’ve come across thus far:
Ingredients:
__ 1 California Pizza Kitchen “White” frozen pizza (it’s the one with cheese and spinach – they didn’t have it for the one I used for the pix – so I had to use some weird non-CPK “Organic” one that boasts “Tastes Organic” – what does that mean?).
__ Kimchi, to taste (I use ~0.5 c; the longer you keep it in your fridge, the more “funk” it gets)
__ Parmigiano Reggiano, to taste
Methods:
0) Preheat the oven as per the frozen pizza’s directions.
1) Pat dry the kimchi you intend to use. Slice kimchi (this is perhaps the only time I’d advise against cutting on a wood cutting board – kimchi will stain it red and give it a funk for along time) into thin strips about 1″ long.
2) Distribute kimchi on top of unwrapped pizza. I tend to avoid the middle of the pizza because the middle is often the least-cooked part of the pizza, and I want the entire crust to be crispy, so I don’t want to add additional water to the middle. Finely grate parm-reg on top of pizza.

Kimchi, say cheese!
3) Bake as per the directions (I bake directly on the oven rack with a sheet of aluminum foil on a rack below to catch drips) plus an extra minute or two. The more kimchi you added, the longer you may have to bake. To ‘test’ doneness, I use a fork/spoon to gently lift the edge of the pizza and see if the pizza is as stiff as I like.

Bake until the crust is golden and the cheese is brown ...

... like this!
4) Remove from oven. Cut and enjoy. Cutting this kind of pizza with a knife might be difficult – go for a rotary pizza cutter.

